DIY: Mini Kit Kittredge's Bed
How I Made Mini Kit Kittredge's Bed

Kit Kittredge's bed was a craft I was thinking long and hard about how to recreate it in mini doll size. How to create a metal bed without being able to use actual metal? I knew there had to be a way, and finally, I decided to attempt it with popsicle sticks, balsa wood, and bamboo skewers.


Stage One: Assemble the Headboard and Footboard.
You will need:
-regular craft sticks (popsicle sticks)
-bamboo skewers
-a small piece of balsa wood, about 1/8 inch thick (or 2-4 jumbo craft sticks)
-glue (tacky or wood)
-skinny sticks
-cutting tools: scissors, Xacto Knife/craft knife, or wire cutters
(whatever you like to use to cut craft sticks.
- Headboard and footboard pattern. Download and print from HERE
1. Lay out craft sticks on your pattern.
I began by drawing a pattern on paper so that I could lay out the size and shape that I wanted.You can print a pattern HERE.
 |
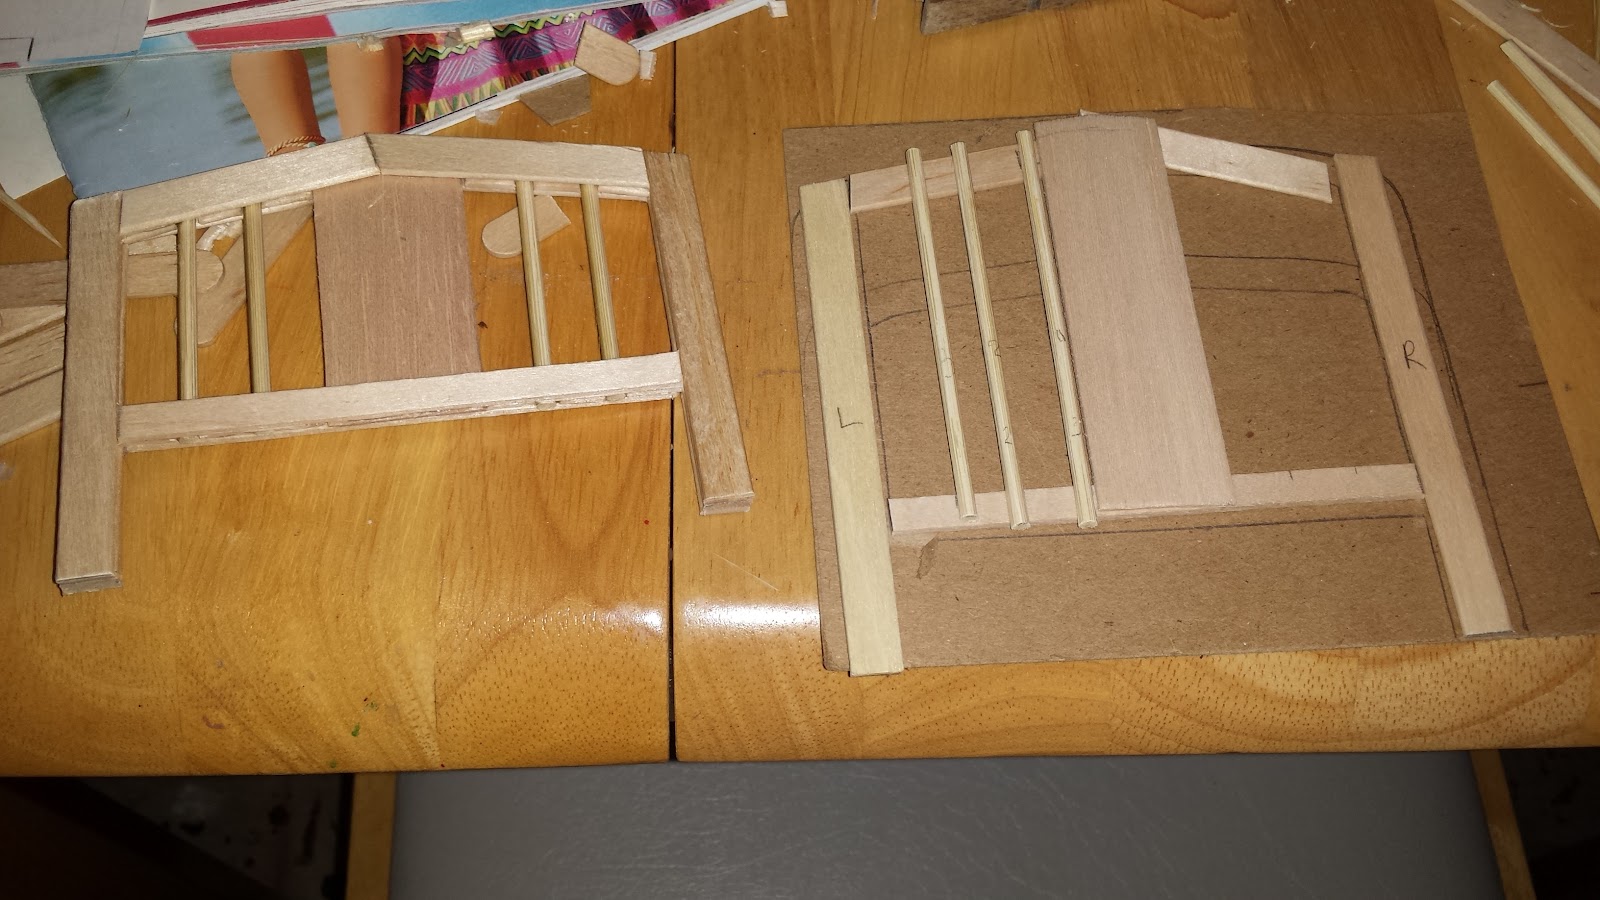
I used the pattern to cut and lay out popsicle sticks in the right sizes and shapes. You can use scissors, wire cutters, or an Xacto knife to cut your popsicle sticks. In the above picture you can see the pattern drawn for the footboard, and the sticks are laid out on the pattern drawn for the (taller) headboard. As you lay out the pattern, glue the pieces together with a little wood or tacky glue, just to hold them in place.You're going to create the head and footboard in three layers. This is layer #1.
2. Assemble layer 2 of headboard and footboard.
|
 |
| After the frame for the head/footboard is glued together, cut bamboo skewers and glue them vertically along the head and footboard. Use the balsa wood or a jumbo craft stick to make the middle panel. |
 |
| This next step is a little harder. Cut pieces of popsicle sticks to fit in between the bamboo skewers at both the top and bottom of the headboard frame. Glue them onto the frame. Also add another layer of popsicle sticks along the sides of headboard. Using balsa wood (or a jumbo popsicle stick), cut out the solid piece at the center of the headboard. I also glued bamboo skewers to the sides of the piece of balsa wood. This completes layer #2.
3. Assemble layer 3 of the headboard and footboard.
|
 |
| In this picture you can see most of the third layer of popsicle sticks is glued down. I shaved off a little bit of the skewers to help the popsicle sticks lay flat and hold in the skewers. |
 |
| You may want to use clothespins or binder clips to hold the sticks in place while drying. This completes layer #3. |
You will assemble the headboard and the footboard in the same ways as described above.
4. Once the glue is dried, use sand paper to round the top corners and edges of the headboard and footboard.
Stage 2: Assemble and Attach the Side Rails.
You will need:
-jumbo or large craft sticks
-glue
-cutting tools: scissors, Xacto Knife/craft knife, or wire cutters (whatever you like to use to cut craft sticks.
1. Assemble the side rails using two layers of jumbo or large craft sticks.
I used jumbo, but I think large would have been a better height. Cut and layer them together so that they measure 8 inches in length, (2 inch piece + a 6 inch piece), staggered and glued together. I actually made one layer slightly longer, so that a 1/8 inch piece stuck out on each side. This is the part that will be inserted into a groove on the head and footboards.

2. Use a wood carving tool such as this one to carve grooves into the head and footboards for the side rails to be inserted and glued.

 |
| Carving a groove into the head/footboard. Start the groove 1/2 inch from the bottom of the foot. |
 |
| Two grooves carved. |
3. Glue in the side rails to the headboard and footboard, leaving 1/2 inch for the legs on the bottom.
 |
| Here you see the side rail up close being glued into place. *Note: I used jumbo craft sticks for the side rails, but they did make the bed a little too tall when being used as a single bed. |
 |
| This shows the headboard with the left front and right front side rails laying out on either side, ready to be glued in. |


Glueing in the left front side rail. You may have to sand down the siderail a little to fit it in the groove so it's snug against the headboard. (It depends how deep your groove is).
 |
| I think I'm marking how far I need to sand it down. I really can't remember! Sorry :( |
 |
| And here is the assembled headboard, footboard, and side rails! Waiting for the glue to dry... |
Stage Three: Assemble the FOLD OUT BED.
You will need:
-Skinny Sticks
-Bamboo Skewers
-Doll house Hinges (4)
-cutting tools: scissors, Xacto Knife/craft knife, or wire cutters
(whatever you like to use to cut -craft sticks).
1. Measure across your bed from the outside of each side rail. It should measure about 4 1/2 inches.
2. Download and print the plans for Kit's Bed to assemble the fold out portion of the bed.


Follow the Instructions on the plans. Here are some photos I took while I made the bed. You can reference them as you make yours!
 |
| Laying out the skinny sticks |
 |
| I added hinges at this stage since it was easier to make sure the piece fit together. |


 |
| The Frame |


 |
| The assembled pull-out bed. |
 |
| The hinges for the stand need to be installed on the edges when the pieces are fitted together in the closed position. |
 |
| Here you can see how the pieces fit together so that the folded up bed will lay flat. |
 |
| Closed |


And you're done! Thanks for joining us!
Remember, if you can think it, you can MAKE IT!
Merry Mini-Making!
Remember to follow on
Instagram, Facebook, and You Tube!
WOW! I absolutely LOVE this! So much like the 18" bed. Outstanding!
ReplyDeleteThank you so much for reading!
Delete